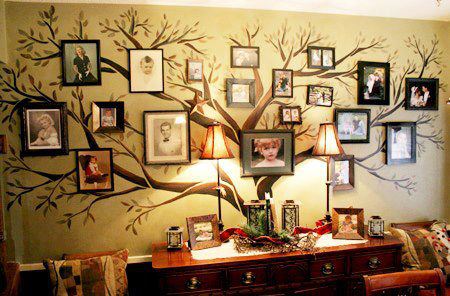
Good Ideas..
DIYnetwork.com/decorating/index
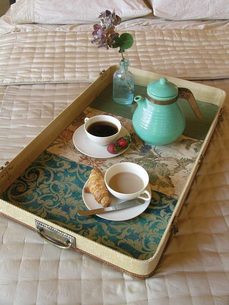
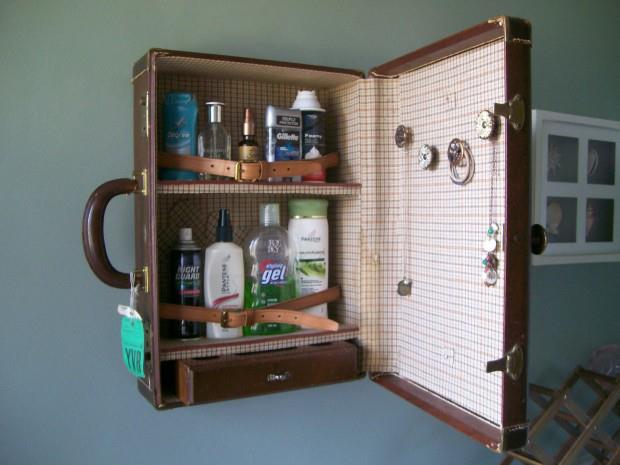
suitcase lid as a tray
|
I had a clever thought
just after you did too, and in the sharing of the questions the thoughts just grew and grew ~blossoms~ |
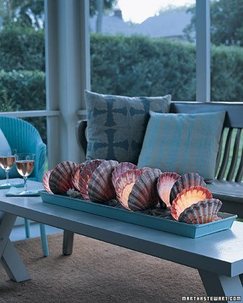
shells with candles between 2
|
- Markbroadbent.org/how-to-motivate-people
- Cutest campers ever ~ Aussieteardrops.com
- Home deco ideas
- Completely-coastal.com/decorating-ideas-and-tips
- Completely-coastal.com/coastal-beach-and-nautical
- Completely-coastal.com/crafts-diy-projects
- Completely-coastal.com/HouseTours
- Completely-coastal.com/calm-white-and-grey-decor
- Houzz.com/photos/1512-Dolphin-Terrace--night-shots--transitional--los-angeles
- diydoctor/projects/bathroom
- Display table using paint and a shelf
- Lowes.com/creative-ideas
- Thehomesteadsurvival.com/free-plans-triple-bunk-beds
sketch
idea from here
- Thehandmadedress/new-triple-bunks with cute safety cut-outs
- Thehomesteadsurvival/sweet-pea-bunk-bed-what-little-girl-would-not-be-thrilled-to-receive-this
- Themerrythought/diy-pallet-swing-bed
- Engineeringahome/pretty-front-porch-diy-large-cedar-planter-boxes
- Thehomesteadsurvival.com/purposing-wood-pallets-17-amazing-project-ideas
- Instructables/Build-Easy-Free-Standing-Shelving-Unit-For-Garage/Basement
- Garden Ideas
- Youtube.com=how+to+do+paving Aquascape's "NEW" How To Build a Pondless® Waterfall - www.youtube.
to flourish next growing/flowering time
Alyssum looks like an annual, but will prune back and live for years
- Click here to download the perennial planting plan »
- more plant ideas birdsandblooms.com/Butterflies/Spring/Butterfly-Gardens
- one lady's small design birdsandbloomsblog/small butterfly garden
- large design birdsandblooms/Bigger-Than-Life-Butterfly-Garden
- Butterflywebsite.com/butterflygardening

How-to-build-a-rocket-stove-and-impress-the-boys
- or just get him to make it ;)
|

Also look at Easter, Christmas, Autumn glasses
Tip - could just sit the candle in the sand |
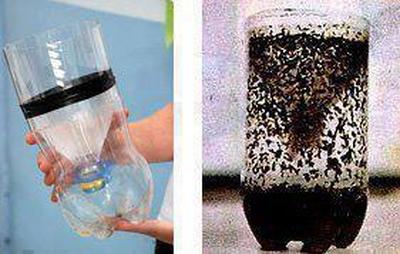
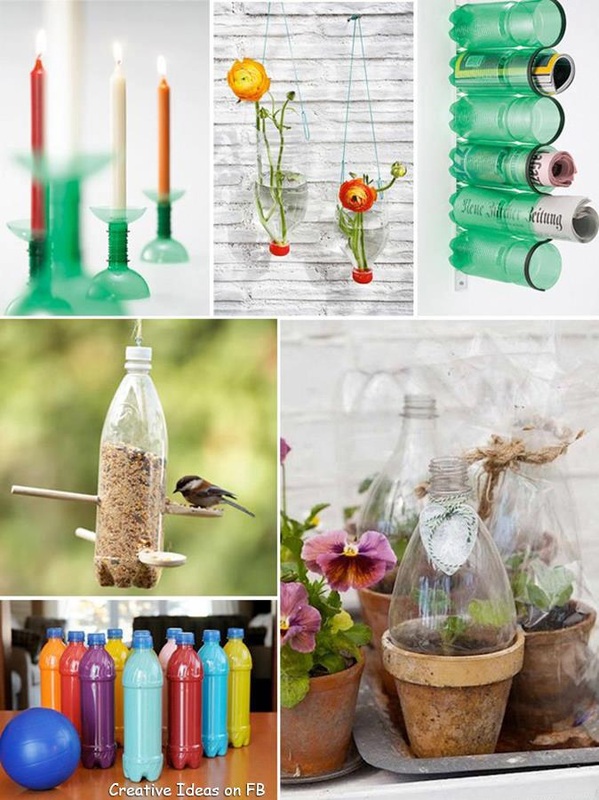
HOMEMADE MOSQUITO TRAP:
1 cup of water , 1/4 cup of brown sugar
1 gram of yeast, 1 2-liter bottle
1. Cut the plastic bottle in half.
2. Mix brown sugar with hot water. Let cool. When cold, pour in the bottom half of the bottle.
3. Add the yeast. No need to mix. It creates carbon dioxide, which attracts mosquitoes.
4. Place the funnel part, upside down, into the other half of the bottle, taping them together if desired.
5. Wrap the bottle with something black, leaving the top uncovered, and place it outside in an area away from your normal gathering area. (Mosquitoes are also drawn to the color black.)
Change the solution every 2 weeks for continuous control.
spray paint the flowers, maybe lightly spray them with glitter too
|
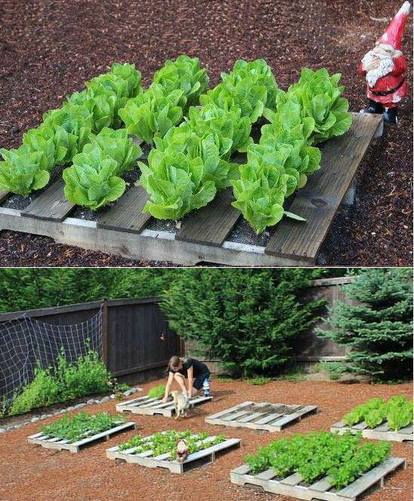
Pallet garden beds, staple covering in base and fill with soil
|

cut collar, sleeves off, sew up, button over fill cushion
|
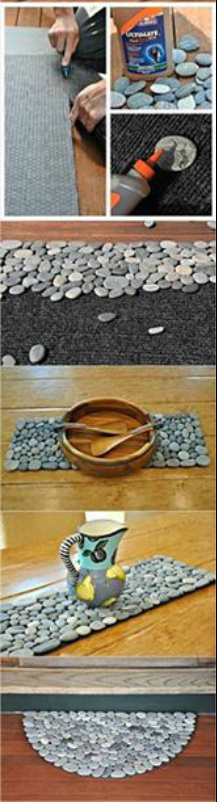
Indoor/outdoor carpet, Elmer's Ultimate glue
or Gorrilla glue or E6000. Glue on pebbles, you could give it a coat of varnish / protector. |

no welding, just drill holes and join with old nuts & bolts! They look great!
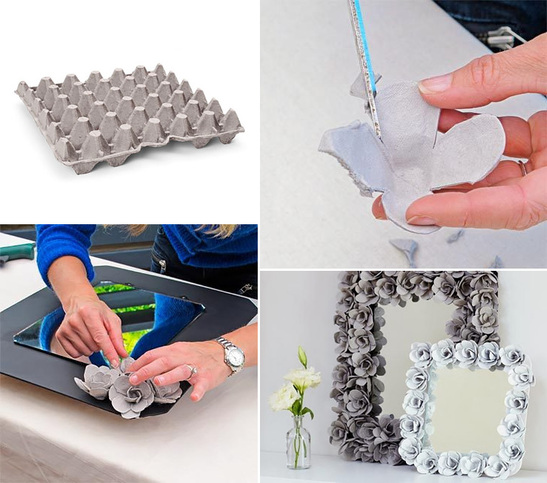
- mod podge - food coloring - water - bake 45 mins

Chair before
|
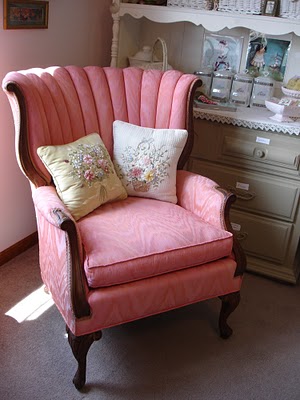
chair after
|
See the peachy chair made pinky new
1 Cup of latex satin paint (in the color of your choice)
1 Spray bottle full of water, ready for refills
1 paint brush or foam brush
Fabric medium eg Delta Textile Medium (equal to the amount of paint that you use) BUY at craft shop
Acrylic craft paint (match the color of the Latex paint,
but this can be skipped and just use latex paint if it's easier)
Pint jar to mix paint in
Painters tape/masking tape to cover any wood.
Sand paper in super fine grit
Not messy, but put a drop cloth under the chair.
Tutorial:
1. Make sure the chair is wiped free of dust and debris. Clean it well.
2. Mix 1:1 parts of latex paint and fabric medium.
3. Water that paint/ textile medium mixture down.
Mix in about 1/2 the amount of water as paint. (1 part water to 2 parts paint.) Stir.
It should look more like a stain than a paint.
4. Remove all seat cushions that are not attached from the chair or other furniture item.
5. Spritz (fine mist) the part of the chair you will start with first with water.
I started on the seat cushion first.
Don’t be shy, you want the fabric wet. Rub the water into the fabric.
6. Brush on the paint slowly while blending the best you can. Work the paint into the fabric.
Don’t be afraid to use your hands. Always make your last stroke with the grain
so the fabric lays in the right direction as it dries.
Note: I tried it on a pillow first. If you have a pillow or if there is an underside of a cushion,
start there and see how it goes.
The watered down coats should give you light coverage, almost like a stain. It will also act as a primer.
7. Do two coats this way. Each should be VERY thin. Water it down even more if you have to.
Let the first one dry fully before beginning the second. I let mine dry overnight.
It will look worse before better. This is after one coat.
8. Don’t worry, your arm won’t fall off. It is tiring, though, so you won’t mind resting between coats.
9. Sand any particularly rough parts. Sand lightly with a fine grit sandpaper.
In the direction of the grain, if possible.
10. Once my chair was dry, I chose to spray painted the legs in a glossy white.
11. Now, it’s time for a final coat using the acrylic paint.
Mix it 1:1 with the fabric medium, like you did with the latex paint.
Note: It is not necessary to do an acrylic coat. You can use latex again.
However, most say that acrylic has more pigment.
Either way, you want a third coat and you will want this coat a little thicker.
I mixed this in a cup as well. But, this time, be more generous with the paint and dilute it less.
I’d do a full cup of paint, this size. (See below.)
Add just a few thimbles of water to dilute it a little.
I had to mix my own color since the acrylic paints didn’t come in the color I wanted.
Spray the fabric with water again. It helps it blend and go on more smoothly.
Paint this layer much more generously. This will be the layer that will cover the chair more completely.
Don’t glop it on, but be generous. It should provide full coverage unlike the base coats.
12. I thought my chair needed a little bling, so I added some nail head trim on the arms.
I got the spacing right by folding a piece of paper and taping it so as to laminate it.
13. YOU HAVE A NEW CHAIR
Hint from reader: cut the bristles of paint brush to about 1 inch to “scrub” and rub paint into fabric.
I used Latex eggshell paint with 2 coats.
PS -I used regular wall paint that I had left over, not fabric paint.
This wingback chair was spray painted, try fabric dye in a spray bottle
Do a sample underneath, or beneath a cushion.
TIP - Vinegar works as a wood stain when you add a metal object in the mix
and let it sit in a glass container for a week.
A handful of pennies will produce a beautiful pale Caribbean blue stain- test this, a reader said it didn't work.
A wad of steel wool will give you a rich reddish hue.
A combination of tea and a metal object in vinegar will produce a black stain.
Tea
One simple way to stain wood is to boil tea leaves in two cups of water until you have a deep tea concentrate.
Simply brush the hot tea water onto your wood. Different teas will give you different shades.
Coffee
Brew some strong coffee and let it cool; then apply with your favorite brush or rag.
Let it really soak the wood.
It’s okay if the coffee gathers in small puddles on the wood.
You’ll get a deeper stain depending on how long you let the stain sit.
Check it ten minutes after application by wiping a section clean of coffee.
Not dark enough for you? Let the coffee sit longer.
Walnut Hulls
Black walnut hulls, soaked for several days, create a dark wood stain. Strain the mixture before you use it.
Some people prefer to boil the hulls first, and then allow them to steep.
Black Raspberries
Black raspberries are an effective wood stain when crushed and then rubbed onto wood.
Allow the berry pulp to dry on the wood, and then wipe it away. Berry stains will fade in direct sunlight,
so this method is better for wood that stays indoors.
- Itsakattywhompuslife/painting-upholstered-furniture.
- PLUS Kristy's tutorial is a must read...esp her tips at the bottom.
- Hypheninteriors.com/painted-upholstery-process-revealed
- Do a little research on here - painting upholstery.hypheninteriors.com/painting-upholstery
1 Cup of latex satin paint (in the color of your choice)
1 Spray bottle full of water, ready for refills
1 paint brush or foam brush
Fabric medium eg Delta Textile Medium (equal to the amount of paint that you use) BUY at craft shop
Acrylic craft paint (match the color of the Latex paint,
but this can be skipped and just use latex paint if it's easier)
Pint jar to mix paint in
Painters tape/masking tape to cover any wood.
Sand paper in super fine grit
Not messy, but put a drop cloth under the chair.
Tutorial:
1. Make sure the chair is wiped free of dust and debris. Clean it well.
2. Mix 1:1 parts of latex paint and fabric medium.
3. Water that paint/ textile medium mixture down.
Mix in about 1/2 the amount of water as paint. (1 part water to 2 parts paint.) Stir.
It should look more like a stain than a paint.
4. Remove all seat cushions that are not attached from the chair or other furniture item.
5. Spritz (fine mist) the part of the chair you will start with first with water.
I started on the seat cushion first.
Don’t be shy, you want the fabric wet. Rub the water into the fabric.
6. Brush on the paint slowly while blending the best you can. Work the paint into the fabric.
Don’t be afraid to use your hands. Always make your last stroke with the grain
so the fabric lays in the right direction as it dries.
Note: I tried it on a pillow first. If you have a pillow or if there is an underside of a cushion,
start there and see how it goes.
The watered down coats should give you light coverage, almost like a stain. It will also act as a primer.
7. Do two coats this way. Each should be VERY thin. Water it down even more if you have to.
Let the first one dry fully before beginning the second. I let mine dry overnight.
It will look worse before better. This is after one coat.
8. Don’t worry, your arm won’t fall off. It is tiring, though, so you won’t mind resting between coats.
9. Sand any particularly rough parts. Sand lightly with a fine grit sandpaper.
In the direction of the grain, if possible.
10. Once my chair was dry, I chose to spray painted the legs in a glossy white.
11. Now, it’s time for a final coat using the acrylic paint.
Mix it 1:1 with the fabric medium, like you did with the latex paint.
Note: It is not necessary to do an acrylic coat. You can use latex again.
However, most say that acrylic has more pigment.
Either way, you want a third coat and you will want this coat a little thicker.
I mixed this in a cup as well. But, this time, be more generous with the paint and dilute it less.
I’d do a full cup of paint, this size. (See below.)
Add just a few thimbles of water to dilute it a little.
I had to mix my own color since the acrylic paints didn’t come in the color I wanted.
Spray the fabric with water again. It helps it blend and go on more smoothly.
Paint this layer much more generously. This will be the layer that will cover the chair more completely.
Don’t glop it on, but be generous. It should provide full coverage unlike the base coats.
12. I thought my chair needed a little bling, so I added some nail head trim on the arms.
I got the spacing right by folding a piece of paper and taping it so as to laminate it.
13. YOU HAVE A NEW CHAIR
Hint from reader: cut the bristles of paint brush to about 1 inch to “scrub” and rub paint into fabric.
I used Latex eggshell paint with 2 coats.
PS -I used regular wall paint that I had left over, not fabric paint.
This wingback chair was spray painted, try fabric dye in a spray bottle
Do a sample underneath, or beneath a cushion.
- Cassandradesign/delicious-purple-tufted-wingback chair
- Missmustardseed/antiquing-wax-tutorial
- Elizabethandco/how-i-make-chalk-paint
- Stonegableblog/creating-color-wash-effect
TIP - Vinegar works as a wood stain when you add a metal object in the mix
and let it sit in a glass container for a week.
A handful of pennies will produce a beautiful pale Caribbean blue stain- test this, a reader said it didn't work.
A wad of steel wool will give you a rich reddish hue.
A combination of tea and a metal object in vinegar will produce a black stain.
Tea
One simple way to stain wood is to boil tea leaves in two cups of water until you have a deep tea concentrate.
Simply brush the hot tea water onto your wood. Different teas will give you different shades.
Coffee
Brew some strong coffee and let it cool; then apply with your favorite brush or rag.
Let it really soak the wood.
It’s okay if the coffee gathers in small puddles on the wood.
You’ll get a deeper stain depending on how long you let the stain sit.
Check it ten minutes after application by wiping a section clean of coffee.
Not dark enough for you? Let the coffee sit longer.
Walnut Hulls
Black walnut hulls, soaked for several days, create a dark wood stain. Strain the mixture before you use it.
Some people prefer to boil the hulls first, and then allow them to steep.
Black Raspberries
Black raspberries are an effective wood stain when crushed and then rubbed onto wood.
Allow the berry pulp to dry on the wood, and then wipe it away. Berry stains will fade in direct sunlight,
so this method is better for wood that stays indoors.
- Littlegreennotebook/how-to-upholster-bench/chair-corners
- Paintedfurnitureideas.com/how-to-paint-without-brush-strokes
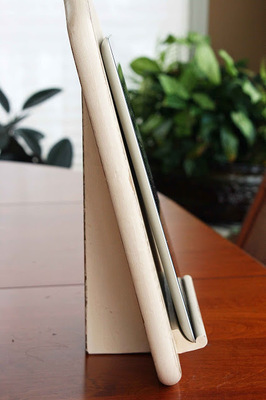
ipad holder.....1 chopping block, 1 scrabble holder, 1 wooden block.
Kitchen iPad holder - not $34.50.
But $2 with a kitchen board, scrabble wood, and block of wood. No scrabble bar? Find a piece of wood and glue another piece of wood along it, to form the lip.
|
If you find discarded hoses, here's some uses for them, chair webbing and baskets and filling in cabinets.
How amazing Brown paper flooring - cheap option 1. Domesticimperfection/paper-bag-floors-a-tutorial 2. Lovelycraftyhome/the-brown-paper-flooring-guide ♥♥♥ Garage storage idea |
Pinterest.com/source/homeplans.com
Homeplans.com
Sawdustandembryos./burn-pile-buffetpart-2-using-stain-leaf.pattern top
Lovedesigncreatecom/photos_stream
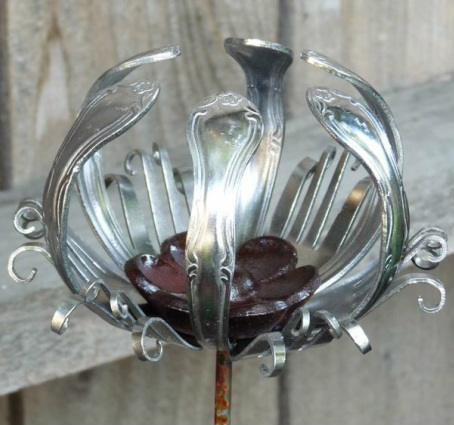
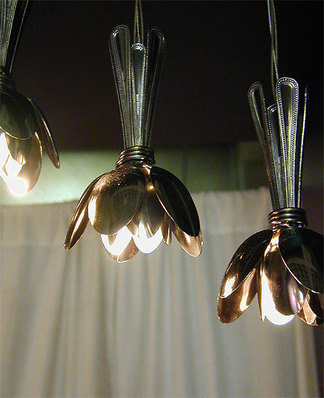
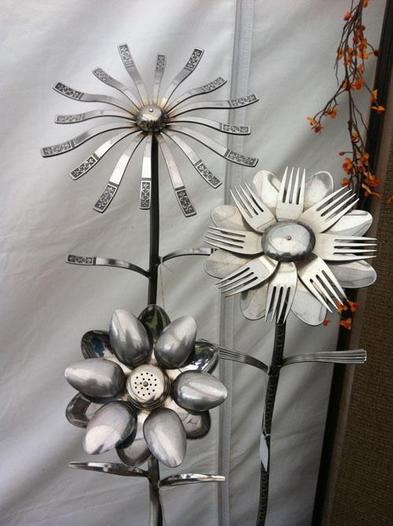
Cutlery candle holder
|
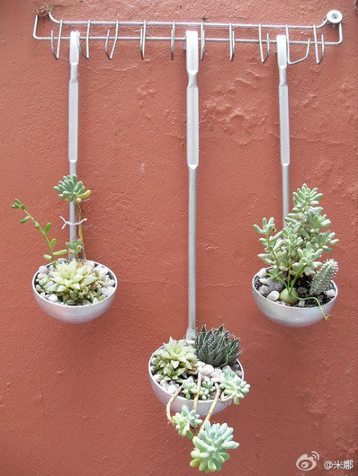
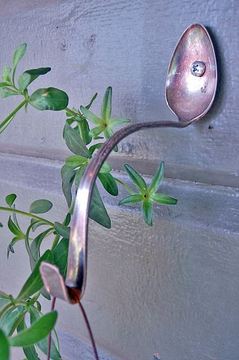
Soup spoon succulent hanger
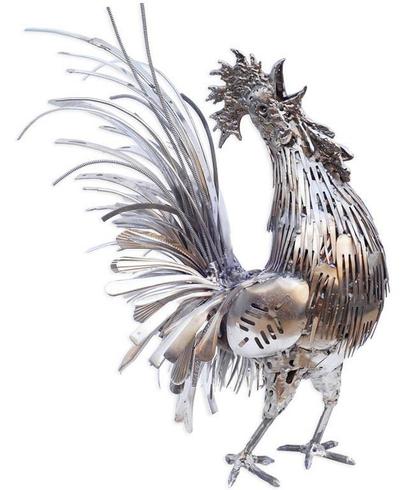
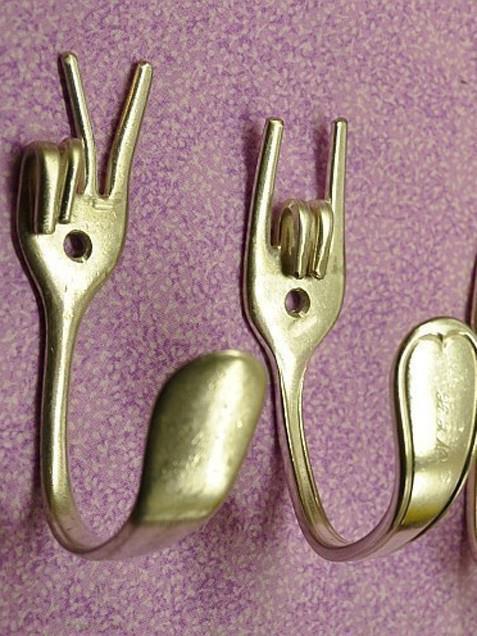
Silverware rooster
|

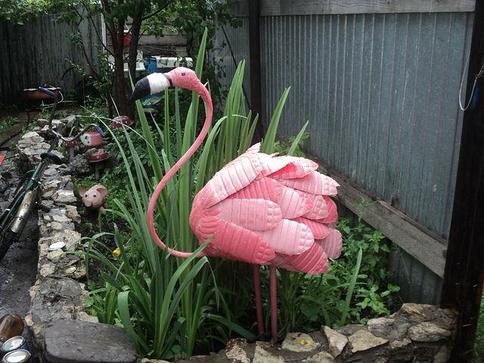
Re-used tyre craft- click 4 more re-tyred ideas
|
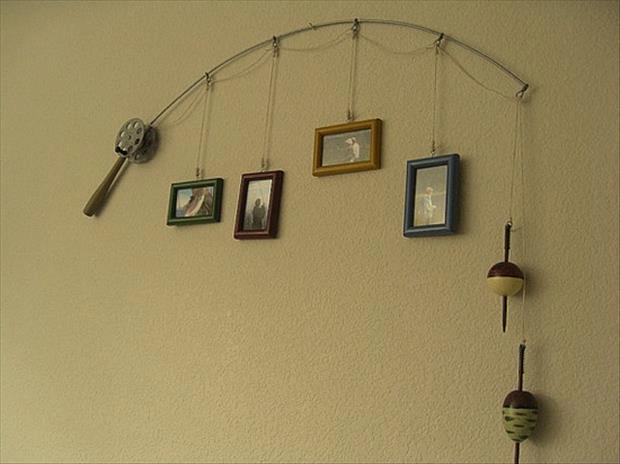
Fishing line photograph hanger
|
HOMEMADE MOSQUITO TRAP:
Items needed:
1 cup of hot water , 1/4 cup of brown sugar, 1 gram of yeast, 2-liter bottle
1. Cut the plastic bottle in half.
2. Mix brown sugar with hot water. Let cool. When cold, pour it in the bottom half of the bottle.
3. Add the yeast. No need to mix. It creates carbon dioxide, which attracts mosquitoes.
4. Place the funnel part, upside down, into the other half of the bottle, taping them together if desired.
5. Wrap the bottle with something black, leaving the top uncovered, and place it outside in an area away from your normal gathering area. (Mosquitoes are also drawn to the color black.)
Change the solution every 2 weeks for continuous control, or put out new bottle trap
- 1. How to Play Ukulele by Jake Shimabukuro -playlist
- 2. Mighty Uke Trailer 3.0
- MIghty Uke is a feature documentary that travels the world
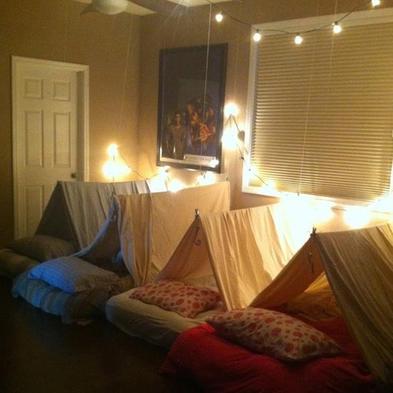
A fun sleepover - a long beam or rope is strung across room and string tied from beam to ends of dowel and sheets flung over each dowel
|
|

Breathe new life into an old watch
|

|
DIY-bathroom-mirror-tile frame - a-re-do-for-only-$18
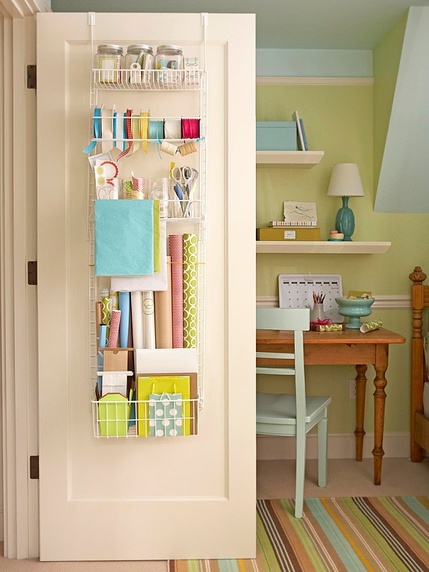
Door storage, a gift - wrapping station
|

Use pallets for coffee table, add a ladder for wall interest
|
Photography
|
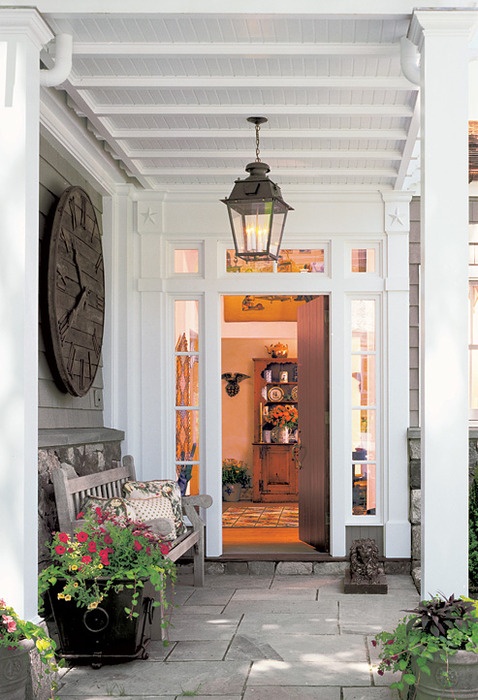
Place a cozy bench on front porch
|

|
Sunshine & Sweetie Pies
IT'S MORE FUN to be nice than it is to be mean. More fun to be hidden than it is to be seen. More fun to laugh than it is to cry. More fun to ask than to wonder why. More fun to help than it is to hurt. More fun to labor than it is to shirk. More fun to be truthful than it is to lie. More fun to live than it is to die. More fun to run that it is to sit... and it's more fun to try than it is to quit... Love, Linda |
|
All I learned..... from a dog:
1. Never pass up a joy ride. 2. Allow fresh air and wind in your face to be pure ecstasy. 3. When loved ones come home, always run to greet them. 4. When it's in your best interest, always practice obedience. 5. Let others know when they've invaded your territory. 6. Take naps, always stretch before rising. 7. Run, romp, and play daily. 8. Eat with gusto and enthusiasm. 9. Be loyal. 10. Never pretend to be what you're not. 11. If what you want lies buried, dig until you find it. 12. When someone is having a bad day, be silent, sit close by and nuzzle them gently. 13. Delight in the simple joy of a long walk. 14. Thrive on attention, let people be near. 15. Avoid biting when a growl will do. 16. On hot days, drink lots, lie under tree. 17. When happy, dance and wag. 18. No matter how often you are criticized, don't buy into that and pout. Run right back and make friends. ♥♥♥ |

|

13 uses for a ladder
|
*#############* ********** What a very clever way to separate egg yolk and white! Type in any address, yours, a friend's or a tourist place |
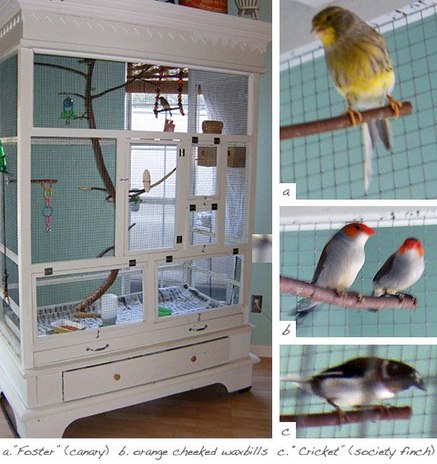
Armoire turned into a birdcage,
|
|
|
Re-think its....
Should you find something on your dinner plate that doesn't appeal to you, .... don't complain. There are people who don't have anything on their plate. Should you find yourself stuck in traffic,.... don't despair. There are people in this world for whom driving is an unheard of privilege. Should you despair over a relationship gone bad, think of the person who has never known what it's like to love and be loved in return. Should you grieve the passing of another weekend, think of the woman in dire straits, working twelve hours a day, seven days a week to feed her children. Should your car break down, leaving you miles away from assistance, think of the paraplegic who would love the opportunity to take that walk ~Unknown~ 
Bookcase or a pot-plant stand
pinyourhome.com/home-design-ideas
|
Two Days We Should Not Worry..
There are two days in every week about which we should not worry, two days which should be kept free from fear and apprehension. One of these days is Yesterday with all its mistakes and cares, its faults and blunders, its aches and pains. Yesterday has passed forever beyond our control. All the money in the world cannot bring back Yesterday. We cannot undo a single act we performed; we cannot erase a single word we said. Yesterday is gone forever. The other day we should not worry about is Tomorrow with all its possible adversities, its burdens, its large promise and its poor performance; Tomorrow is also beyond our immediate control. Tomorrow's sun will rise, either in splendor or behind a mask of clouds, but it will rise.Until it does, we have no stake in Tomorrow,for it is yet to be born. This leaves only one day, Today. Any person can fight the battle of just one day. It is when you and I add the burdens of those two awful eternities Yesterday and Tomorrow that we break down. It is not the experience of Today that drives a person mad, it is the remorse or bitterness of something which happened Yesterday and the dread of what Tomorrow may bring. Let us, therefore, Live but one day at a time. ~Unknown~ |
